

Cilium은 Kubernetes를 위한 고급 네트워킹 및 보안 기능을 제공하는 오픈 소스 프로젝트입니다. Linux 커널의 eBPF(extended Berkeley Packet Filter) 기술을 활용하여 효율적이고 유연한 네트워킹 및 보안 정책을 가능하게 합니다.
Cilium CNI 플러그인은 kube-proxy와 같은 기본 Kubernetes 네트워킹 플러그인을 대체하고 향상된 네트워킹 기능을 제공합니다.
다음 글에서는 Cilium에서만 제공되는 hubble에 대해서 테스트 해보겠습니다.
1.Enable hubble in Cilium
이전 글과 같이 cilium을 정상적으로 kubernetes cluster 환경에서 설치 후 cilium hubble을 사용가능한 상태로 만듭니다.
kevin@k8s-master:~$ cilium hubble enable
🔑 Found CA in secret cilium-ca
ℹ️  helm template --namespace kube-system cilium cilium/cilium --version 1.13.3 --set cluster.id=0,cluster.name=kubernetes,encryption.nodeEncryption=false,hubble.enabled=true,hubble.relay.enabled=true,kubeProxyReplacement=disabled,operator.replicas=1,serviceAccounts.cilium.name=cilium,serviceAccounts.operator.name=cilium-operator,tls.ca.cert=LS0xQUxzd210M0F5UjdCbUd5dAo0aG9NdnJaU1NUZz0KLS0tLS1FTkQgQ0VSVElGSUNBVEUtLS0tLQo=,tls.ca.key=[--- REDACTED WHEN PRINTING TO TERMINAL (USE --redact-helm-certificate-keys=false TO PRINT) ---],tunnel=vxlan
✨ Patching ConfigMap cilium-config to enable Hubble...
🚀 Creating ConfigMap for Cilium version 1.13.3...
♻️  Restarted Cilium pods
⌛ Waiting for Cilium to become ready before deploying other Hubble component(s)...
🚀 Creating Peer Service...
✨ Generating certificates...
🔑 Generating certificates for Relay...
✨ Deploying Relay...
⌛ Waiting for Hubble to be installed...
ℹ️  Storing helm values file in kube-system/cilium-cli-helm-values Secret
✅ Hubble was successfully enabled!
다음과 같이 성공적으로 hubble을 사용가능한 상태로 만듭니다.
2.Install the Hubble Client
hubble client 를 설치합니다.
kevin@k8s-master:~$ export HUBBLE_VERSION=$(curl -s https://raw.githubusercontent.com/cilium/hubble/master/stable.txt)
sha256sum --check hubble-linux-amd64.tar.gz.sha256sum
sudo tar xzvfC hubble-linux-amd64.tar.gz /usr/local/bin
rm hubble-linux-amd64.tar.gz{,.sha256sum}kevin@k8s-master:~$ curl -L --remote-name-all https://github.com/cilium/hubble/releases/download/$HUBBLE_VERSION/hubble-linux-amd64.tar.gz{,.sha256sum}
  % Total    % Received % Xferd  Average Speed   Time    Time     Time  Current
                                 Dload  Upload   Total   Spent    Left  Speed
  0     0    0     0    0     0      0      0 --:--:-- --:--:-- --:--:--     0
100 7516k  100 7516k    0     0  5034k      0  0:00:01  0:00:01 --:--:-- 11.2M
  % Total    % Received % Xferd  Average Speed   Time    Time     Time  Current
                                 Dload  Upload   Total   Spent    Left  Speed
  0     0    0     0    0     0      0      0 --:--:-- --:--:-- --:--:--     0
100    92  100    92    0     0    137      0 --:--:-- --:--:-- --:--:--     0
kevin@k8s-master:~$ sha256sum --check hubble-linux-amd64.tar.gz.sha256sum
hubble-linux-amd64.tar.gz: OK
kevin@k8s-master:~$ sudo tar xzvfC hubble-linux-amd64.tar.gz /usr/local/bin
[sudo] password for kevin:
hubble
3.Hubble UI 활성화
UI를 활성화 시킵니다.
kevin@k8s-master:~$ cilium hubble enable --ui
🔑 Found CA in secret cilium-ca
ℹ️  helm template --namespace kube-system cilium cilium/cilium --version 1.13.3 --set cluster.id=0,cluster.name=kubernetes,encryption.nodeEncryption=false,hubble.enabled=true,hubble.relay.enabled=true,hubble.ui.enabled=true,kubeProxyReplacement=disabled,operator.replicas=1,serviceAccounts.cilium.name=cilium,serviceAccounts.operator.name=cilium-operator,tls.ca.cert=**VElGSUNBVEUtLS0tLQo=,tls.ca.key=[--- REDACTED WHEN PRINTING TO TERMINAL (USE --redact-helm-certificate-keys=false TO PRINT) ---],tunnel=vxlan
✨ Patching ConfigMap cilium-config to enable Hubble...
🚀 Creating ConfigMap for Cilium version 1.13.3...
♻️  Restarted Cilium pods
⌛ Waiting for Cilium to become ready before deploying other Hubble component(s)...
🚀 Creating Peer Service...
✅ Relay is already deployed
✨ Deploying Hubble UI and Hubble UI Backend...
⌛ Waiting for Hubble to be installed...
ℹ️  Storing helm values file in kube-system/cilium-cli-helm-values Secret
✅ Hubble was successfully enabled!
Service의 port를 NodePort로 변경합니다.
kevin@k8s-master:~$ kubectl edit svc -n kube-system hubble-ui
service/hubble-ui edited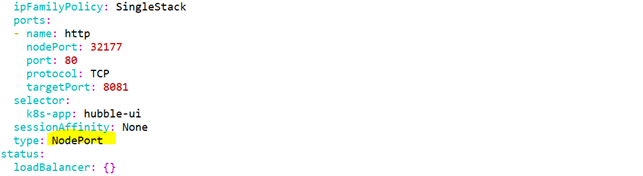
4.Hubble UI 접근
다음과 같이 NodePort로 변경
그 후 http://serverIP:NodePort로 접근

화면 상단에는 한눈에 쿠버네티스 클러스터 상태를 확인할수 있는 UI를, 하단에는 Service의 inbound/outbound 통신 상태를 실시간으로 보여줍니다.
[설치 참조]
https://docs.cilium.io/en/v1.10/gettingstarted/hubble/#hubble-ui
https://docs.cilium.io/en/stable/gettingstarted/hubble_setup/
https://kubernetes.io/docs/tasks/access-application-cluster/port-forward-access-application-cluster/
'Kubernetes (k8s)' 카테고리의 다른 글
| [k8s] how to use falco secure verification on k8s -- CKS (2) | 2023.08.19 |
|---|---|
| [k8s] migrate calico to cilium (0) | 2023.06.12 |
| [k8s] Flannel+Calico에서 Cilium으로 CNI Live Migration을 수행하는 방법 (1) | 2023.06.07 |
| [k8s] k8sgpt -- 쿠버네티스와 ChatGPT? (1) | 2023.06.01 |
| [k8s] Deploy a Django application on kubernetes & HPA test (0) | 2023.05.24 |


댓글